There are two versions of Impression FX Lite – one for PowerPoint presentations and one for PDF documents. The version for PowerPoint is a plugin for Microsoft PowerPoint. The PDF version is a standalone program. The features and interface of both versions are practically identical. When you install the PowerPoint version, an Impression FX tab that gives access to the program menu is added to the PowerPoint control panel.

Create Presentation
Create an Impression FX presentation on the basis of slides in the current PowerPoint or PDF document.
View Last Presentation

View the last Impression FX presentation created for the current document.
Create Video

Open a dialogue window to create a video file.
Creating video

Type
Video codec.
Resolution
Video file resolution.
Frame Rate
Video file frame rate.
Bitrate (kbps)
Video file bitrate (Kbit per second).
Rendering Mode
1. Only Slides
Only slides and transitions between them are recorded in the video file.
2. Menu and Slides
Menu, slides and transitions between them are recorded in the video file.
3. Menu and Slides Rewind
Menu in the slide rewind mode, slides and transitions between them are recorded in the video file.
Output Directory
Folder to save the video file.
Create
Render video file based on the last created presentation.
----------------- Transitions settings ----------------
Theme
Select a set of templates for transition effects.
Template
Select a template for transition effects from the selected set.
Speed
Set up the speed of transition effects.
Elements Color
Set up color of design elements.(for transitions in which the elements color is set)
Background Color
Set up the background color (for transitions in which the background color is set).
Color Preset
Set up a color scheme for transition effects (for transitions in which the a color scheme is set).
Transitions Images

Show the window for controlling images incorporated in transitions. The window is only accessible when the image-employing effect is enabled. Such effects are noted with (pics) in the title.
Transitions images window
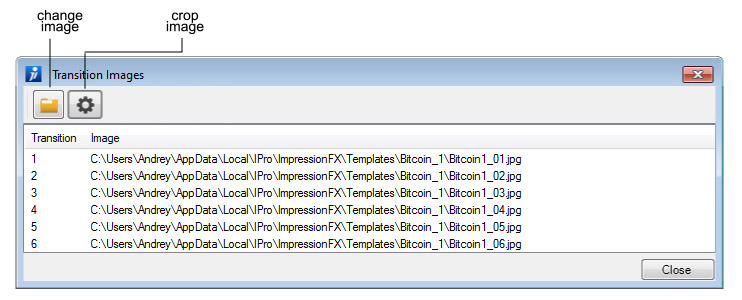
Extra images will be used in transitions between slides, following the order they are listed.
Logo

Show logo settings window.
Logo settings in the presentation menu

Logo background
Show logo background in the menu.
Logo (Business license)
Show logo in the menu.
Business license required (to remove the watermark).
File
Logo file.
Scale
Logo scale in the menu.
Horizontal Shift
Horizontal shift of the logo from the default position. The default position is determined by selected Menu Type.
Vertical Shift
Vertical shift of the logo from the default position. The default position is determined by selected Menu Type.
Logo settings in transition effects

Logo (Business license)
Show logo in transition effects.
This option is only accessible when the logo-employing template is enabled. Such templates are noted with (logo) in the title.
.
Business license required (to remove the watermark).
File
Logo file.
Use Menu Logo
If this option is enabled, the transition effects will use the logo specified in the first menu tab. In this case, a separate setting of the logo for transition effects is unable.
Scale
Logo scale in the menu.
Horizontal Shift
Horizontal shift of the logo from the default position. The default position is determined by selected template.
Vertical Shift
Vertical shift of the logo from the default position. The default position is determined by selected template.
Opacity
Logo opacity.
Transition Preview

Preview the transition effect for the active slide. When you click on the Preview Transition button, a presentation of two slides, the active slide, and the one following it is launched. This allows you to quickly see the transition effect for the active slide without creating a presentation of the entire document.
----------------- Menu and presentation settings ----------------
Presentation menu

Show menu settings window.
Main Settings
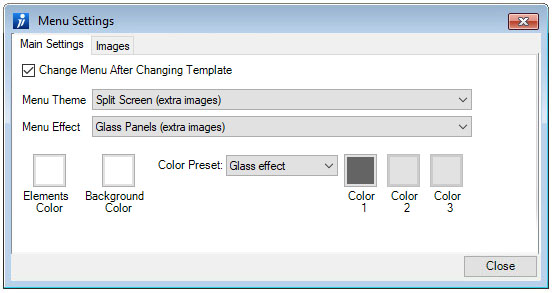
Change Menu after changing template
If this option is enabled, then when you select another transition effects template on the main panel, the menu template will also be changed to the one corresponding to the selected template.
If this option is disabled, then selecting a different template will not change the menu settings.
Menu Theme
Menu Theme defines the set of the menu templates.
Menu Effect
Menu Effect defines the design template from the current set.
Color preset
Set up a color scheme for presentation menu.
Elements Color, Background Color, Color1, Color2, Color3
Additional color settings for presentation menu.
When you set one of the values for Color preset, it defines the values for Color1, Color2 and Color3.
Depending on the selected Menu Effect some of the values such as Elements Color, Background Color, Color1, Color2, Color3 will be customizable.
You can set your own values for these colors to fine tune the settings of color presets for menu.
When you set up the colors yourself, bear in mind that each color has its own meaning and paints different elements.
Use this feature carefully as you can easily get a color combination that does not look good or is not appropriate.
Images

Images used in the menu.
This tab is available if the selected Menu Effect implies the use of images.
The number of images listed is defined by Menu Effect and cannot be changed by the user.
Those of the listed images that are not set, will be replaced by default images.
Presentation Settings

Show presentation settings window.
Transition Back

Transition Time
Duration of the transition to a previous slide (in seconds).
Effect
Effect of the transition to a previous slide.
Autoplay Mode
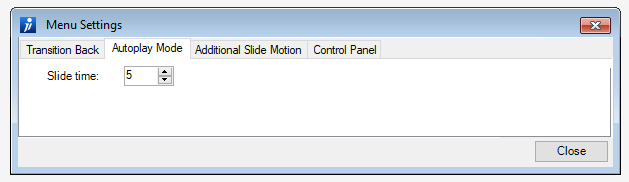
Slide Time
The length of time during which each slide is viewed in the automatic play mode and in video mode.
Additional Slide Motion
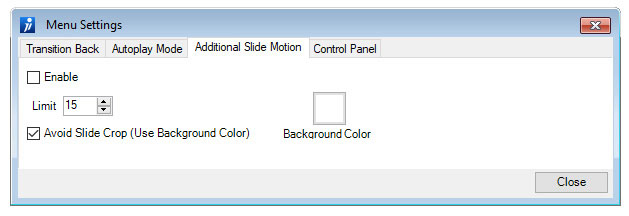
Enable
The Slide Motion mode sets up additional slide motion that takes place at the end of a transition effect. Motion time is defined by the Slide Time value. Enabling the Slide Motion mode allows creating a continuous animation of slides in motion and transitions between them, with no static pauses. We recommend using it when showing slides in automatic mode or when converting a presentation to a video.
Limit
The slide motion range that is set in percentages of slide size.
Avoid Slide Crop
Enabled Avoid Slide Crop option sets slide size changes from (100 - Limit)% to 100%. This avoids cropping the slide.
Disabled Avoid Slide Crop option sets slide size changes from 100% to (100 + Limit)%, and the slide is cropped around the edges while moving.
Background Color
The color of the background at the time the slide is growing. The background is only visible if the Avoid Slide Crop option is enabled.
Control Panel

Show Control Panel
Show Control Panel when demonstrating the presentation.
Position
Position of Control Panel on the screen when demonstrating the presentation.
----------------- Save and Load Impression FX Project ----------------
Templates

Open template manager window.

Select the template you need and install it by clicking the Install button.
You can see a preview of any template using the Preview button.
After installation, the template will appear in the list of available templates on the main program panel.

Load Project

Load Impression FX project.
Save Project

Save Impression FX project.
----------------- Impression FX Settings ----------------
Help

Show Help page.
(Located in the Help/View Help menu option in the Impression FX Lite version for PDF).
About

Show About the Program window.
(Located in Help/About Impression FX menu option in the Impression FX Lite version for PDF).
About Impression FX Lite window

Check version
Check that the program is up-to-date.
(Located in Help/Check Version menu option in the Impression FX Lite version for PDF).
License

Show the Enter License Key window.
(Located in Help/License menu option in the Impression FX Lite version for PDF).
Settings

Show Settings window.
(Located in File/Settings menu option in the Impression FX Lite version for PDF).
Settings Window

Output Directory
Choose the directory where the project file will be created.
Collect Project Files
Collect all Impression FX project files including images used in slide transitions and menu, in one folder.
(Located in Project/Collect menu option in the Impression FX Lite version for PDF).
Copy Presentation
Copy the source PPTX or PDF project to the created folder.
Directory Name
Name of the project folder.